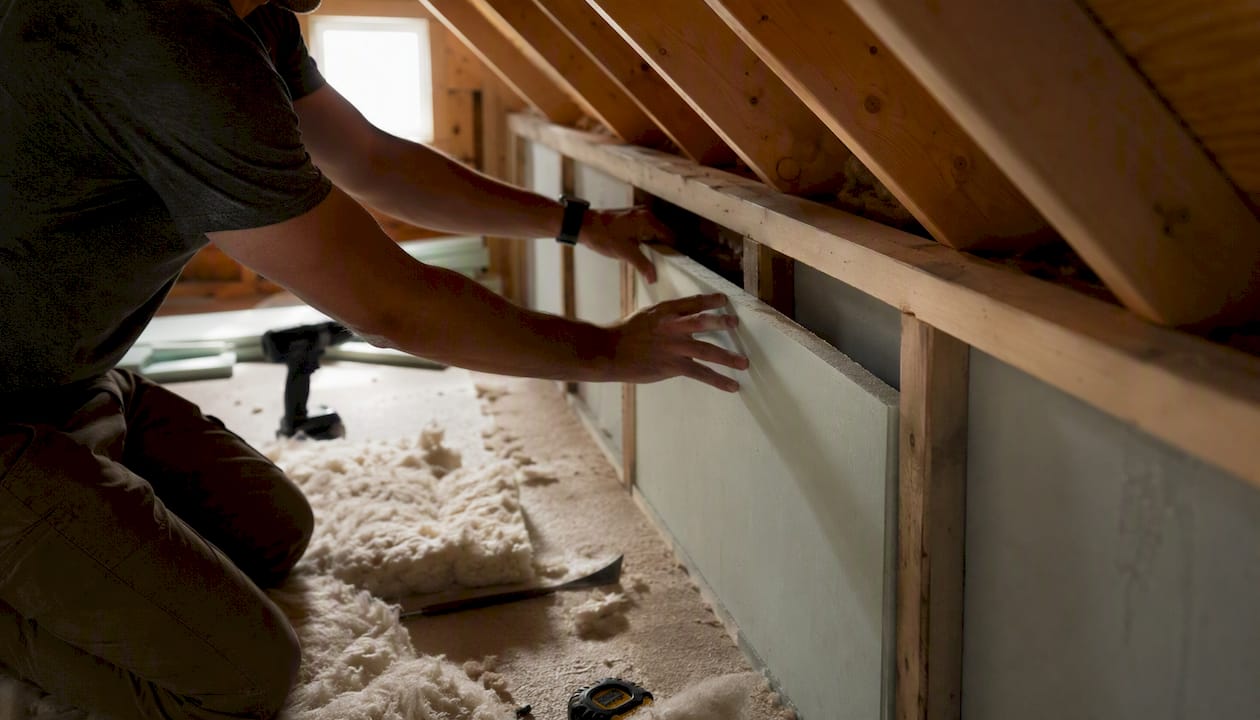

Attic knee wall insulation is the material and air-sealing work that covers the short walls separating your finished attic room from the unheated triangular attic space beside it. Air sealing matters more than insulation thickness here, and it should always come first. If you insulate a leaky knee wall without sealing it, attic air still moves through the fiberglass and cancels out most of the R-value you just paid for.
You’ve got two basic routes. Insulate the knee wall itself and keep the triangular attic behind it vented and unconditioned, or move the insulation up to the roof slope and bring that whole triangular space inside your home’s conditioned envelope. Which one makes sense depends on what’s hiding in that attic, how tight the space is, and whether you plan to use it for storage or leave it alone entirely.
Key Takeaways
Attic knee wall insulation only works when a continuous air barrier is sealed in place before or alongside the insulating material itself.
| Point | Details |
|---|---|
| Air seal before insulating | Block joist bays and seal every penetration first, or new insulation performs far below its rated R-value. |
| Choose materials by cavity depth | Rigid foam board on the attic side adds R-value and air sealing without eating interior space. |
| Match R-value to exterior walls | IECC guidance treats knee walls as part of the thermal envelope, typically R-13 to R-21 depending on climate. |
| Decide vented vs. conditioned | Move insulation to the roof slope if ducts or plumbing run through the triangular attic. |
| Know when to call a pro | Suspected mold, structural questions, or inaccessible cavities are signs to bring in Thecleangenius rather than DIY. |
Table of Contents
- What Is Attic Knee Wall Insulation and Why Does It Matter?
- Why Do Most Knee Wall Insulation Jobs Fail?
- What Insulation Materials Work Best for Knee Walls?
- How Do You Air-Seal a Knee Wall Step by Step?
- Should You Vent the Attic or Bring It Into Conditioned Space?
- How Do You Insulate Tight or Hard-to-Reach Knee Wall Spaces?
- What R-Value and Code Requirements Apply to Knee Walls?
- What Should Be on Your DIY Knee Wall Insulation Checklist?
- When Should You Call a Professional Instead?
- Get a Local Assessment for Your Attic Insulation Project
- Frequently Asked Questions
- Sources
What Is Attic Knee Wall Insulation and Why Does It Matter?
A knee wall is a short vertical wall, usually 3 to 5 feet tall, that runs along the edge of a room built into a sloped roofline. You’ll find them constantly in Cape Cod homes, converted bungalow attics, and bonus rooms over garages. On one side sits your heated living space. On the other sits a low, wedge-shaped attic that never gets conditioned air, often packed with old boxes, holiday decorations, or nothing but roof rafters and dust.
That geometry creates a direct thermal fault line. Your conditioned room touches the knee wall, the knee wall touches unconditioned attic air, and any gap in between becomes a highway for heat loss in winter and heat gain in summer. According to research from the Florida Solar Energy Center, these triangular attics commonly lack proper sheathing on the attic side, which lets outside air infiltrate the wall cavity almost unimpeded.
Homeowners usually notice the fallout before they understand the cause:
- A bonus room that’s freezing in January and stifling in July, no matter what the thermostat says
- Energy bills that creep up every season without an obvious reason
- Ice dams forming along the eaves near the knee wall section of roof
- Attic temperatures over 130°F in summer, baking whatever insulation is up there and anything stored nearby
Next time you open the attic access door, take a flashlight and look at where the knee wall meets the floor and the roof rafters. If you can see daylight, feel a draft, or spot insulation that looks dark and matted, you’re looking at exactly the failure this guide is going to fix.
Why Do Most Knee Wall Insulation Jobs Fail?
Most knee wall problems trace back to the same handful of construction shortcuts, and they’re worth checking for before you buy a single roll of insulation. Fiberglass batts sag over time, especially if they were friction fit without support, leaving gaps at the top where heat escapes fastest. Attic-side sheathing is often missing altogether, meaning nothing separates your batt insulation from open attic air.
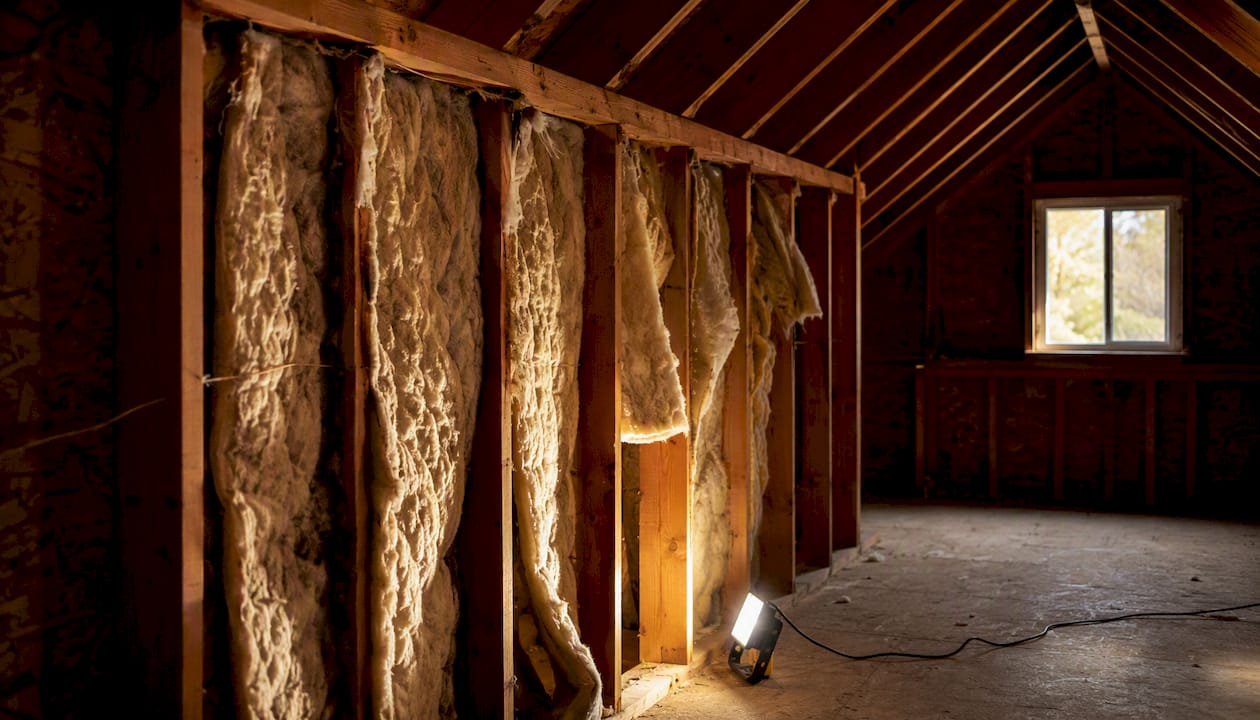
The Building America Solution Center notes that air leakage, not insulation thickness, causes most knee wall comfort complaints. Batts can perform close to R-0 in real-world conditions if attic air is allowed to wash through them from behind.
Watch for these specific failure points during an inspection:
- Missing or damaged sheathing on the attic-facing side of the wall
- Batts that have slipped, compressed, or pulled away from the framing
- Open joist bays under the knee wall’s bottom plate, letting attic air rise straight into the wall cavity
- Unsealed penetrations for wiring, electrical boxes, or old plumbing stubs
Pro Tip: Before you touch any insulation, check whether the knee wall is helping brace the roof rafters. Some knee walls carry real structural load, and removing or cutting into studs without confirming that first can create a much bigger problem than a drafty bonus room.
What Insulation Materials Work Best for Knee Walls?
The right material depends on your cavity depth, your climate, and how much of the attic-side wall you can actually reach. Standard 2×4 knee wall framing gives you 3.5 inches of cavity depth, which limits your options more than a full exterior wall would.
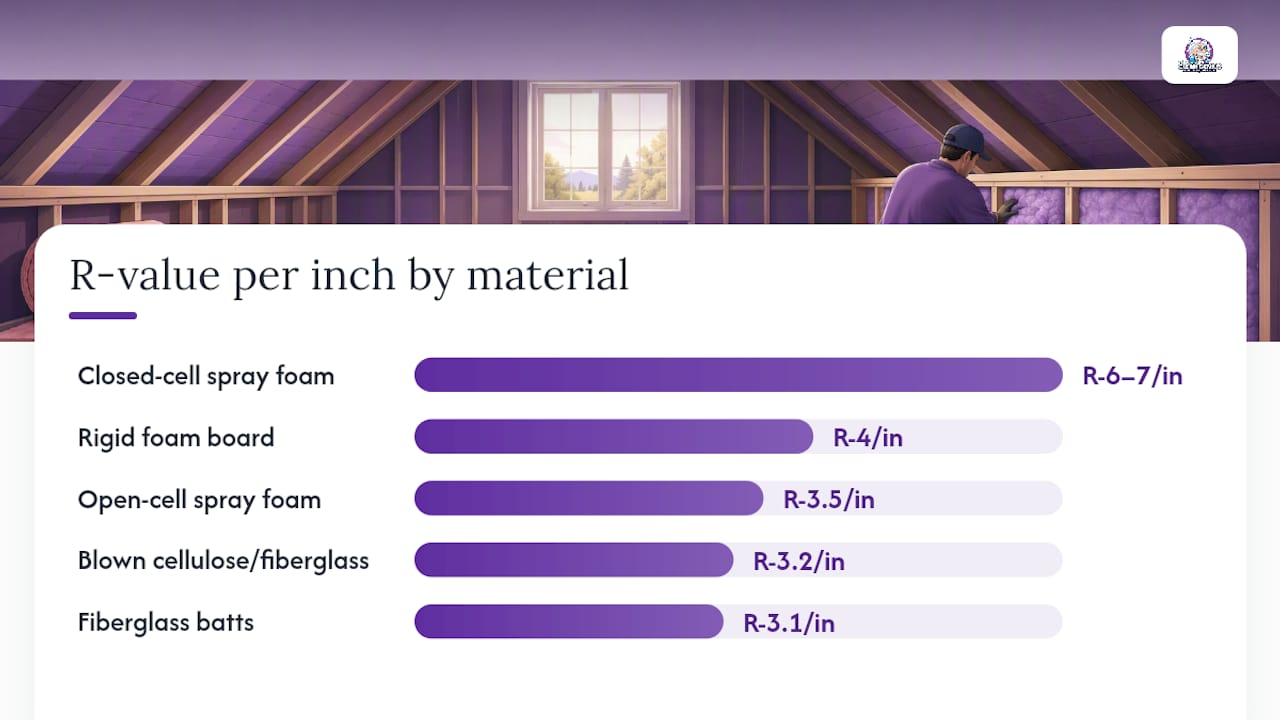
Fiberglass batts remain the most common choice because they’re cheap and easy to cut to size, but they only work if something seals them off from attic air on the far side. Blown cellulose or fiberglass fills irregular cavities more completely and resists settling better than batts, though it still needs a solid air barrier to perform. Closed-cell spray foam delivers the highest R-value per inch and doubles as its own air barrier, which makes it the strongest single-step option for tight cavities, at a higher material cost. Open-cell spray foam costs less than closed-cell but doesn’t block moisture vapor as effectively, so it needs more thought in cold climates. Rigid foam board, cut and sealed against the framing, adds R-value while creating a durable barrier that outlasts flexible options like housewrap.
| Material | R-Value per Inch | Air-Sealing Performance | Best Use Case | Moisture Risk | Typical Cost Band | DIY Friendliness |
|---|---|---|---|---|---|---|
| Fiberglass batts | R-3.1 | Poor alone; needs a separate air barrier | Retrofit with added sheathing | Low if sealed properly | Low | High |
| Blown cellulose/fiberglass | R-3.2 | Poor alone; needs blocking and sealing | Irregular or hard-to-reach cavities | Moderate if unsealed | Low to moderate | Low (needs equipment) |
| Closed-cell spray foam | R-6 to R-7 | Excellent, acts as its own air barrier | Tight cavities, cold climates | Low | High | Low (pro-recommended) |
| Open-cell spray foam | R-3.5 | Good, but vapor-permeable | Moderate climates, ducted attics | Moderate | Moderate | Low (pro-recommended) |
| Rigid foam board | R-4 | Excellent when seams are taped and sealed | Attic-side sheathing over batts | Low | Moderate | Moderate |
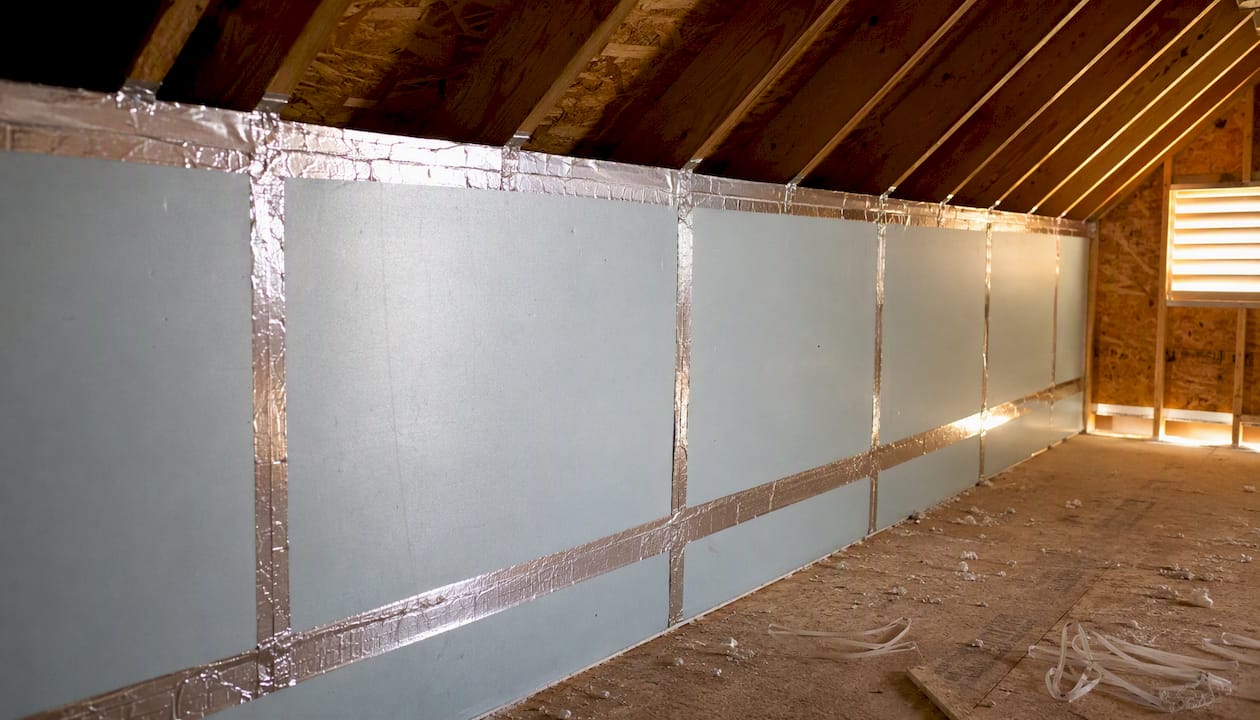
For a typical retrofit, the Insulation Institute recommends filling the cavity to roughly R-13 with batts, then adding a layer of taped, sealed rigid foam board on the attic side. That combination gets you both the R-value bump and the continuous air barrier that batts alone can’t provide, and it matches or beats the R-value of most exterior walls in the house.
Pro Tip: If your knee wall cavity is already tight and you’re worried about losing living space, rigid foam board on the attic side almost always beats adding a second layer of batts. It takes up zero interior room and seals better than compressed fiberglass ever will.
How Do You Air-Seal a Knee Wall Step by Step?
Insulation performs close to its rated R-value only when air sealing happens first. Skip this sequence and you’re just insulating a hole in your thermal envelope.
- Inspect the attic access first. Look for gaps around the hatch itself, visible daylight at the knee wall base, and any insulation that looks compressed or discolored from moisture.
- Block the joist bays under the knee wall. Cut rigid foam or solid wood blocking to fit between each joist at the wall’s bottom plate, then seal the perimeter with caulk or canned spray foam. This single step closes one of the biggest attic air leaks in the whole house, according to guidance from Energy.
- Seal the top and bottom plates and every penetration. Electrical boxes, wire holes, and old plumbing stubs all need a bead of caulk or foam before you move on.
- Install cavity insulation. Fit batts snugly without compressing them, or have blown insulation installed to full depth.
- Add attic-side sheathing and seal the seams. Rigid foam or OSB panels, taped and sealed at every joint, turn the whole assembly into a real air barrier.
- Verify your work. A visual check with a flashlight catches most gaps; a blower-door test, if you can arrange one, will confirm the fix quantitatively.
You’ll need caulk and a caulk gun, canned spray foam, rigid foam board cut to size, sealing tape rated for foam board seams, a utility knife, and basic protective gear. Attics get hot fast and dusty even faster, so wear a respirator rated for fiberglass or cellulose particles, keep an eye on ventilation while you work, and be careful around any old knob-and-tube wiring or exposed junction boxes.
Should You Vent the Attic or Bring It Into Conditioned Space?
You’ve got a real choice to make here, and it depends heavily on what’s actually inside that triangular attic. Keeping it vented and unconditioned, with insulation on the knee wall itself, is the simpler and cheaper route, but it demands careful, meticulous sealing to actually work.
Moving the insulation to the roof slope and treating the triangular attic as part of your conditioned space is often the better long-term call, particularly if ducts or plumbing run through it. As Fine Homebuilding points out, ducts and pipes sitting in an unconditioned attic lose energy constantly and risk freezing in cold climates, so pulling that whole space into the envelope solves multiple problems at once.
Run through this quick decision checklist before committing to one approach:
- Are there ducts or plumbing in the triangular attic? If yes, lean toward the unvented, roof-insulated approach.
- Can you actually crawl in and work? Tight, uncrawlable spaces limit you to blown-in or foam methods regardless of which route you pick.
- How much cavity depth do you have at the roof slope? Insufficient depth may rule out batts and push you toward spray foam.
- Will the space be used for storage or stay empty? Storage use favors bringing it into conditioned space so temperature swings don’t damage what’s stored there.
Switching to an unvented approach means paying closer attention to condensation control, since you’re removing the ventilation path that used to carry moisture out. That’s usually solved with continuous rigid foam or spray foam at the roof deck rather than fibrous insulation alone.
How Do You Insulate Tight or Hard-to-Reach Knee Wall Spaces?
Plenty of triangular attics are too shallow to crawl into at all, which rules out standard batt work entirely. Dense-pack cellulose, blown through a small access port cut into the knee wall, can fill these spaces effectively without anyone needing to enter the cavity. The Green Building Advisor notes this method works well in practice, but it can conflict with local ventilation or fire-separation requirements, so check with your building department before committing.
A few more tactics that hold up in cramped conditions:
- Cut-and-seal rigid foam panels can serve double duty as both insulation and air barrier when you can’t reach far enough to install full sheathing.
- Open joist cavities beneath the knee wall’s bottom plate can be plugged with foam or cut rigid board pushed in from whatever access you do have, blocking the airflow path even if you can’t seal the whole wall.
- Small port access for blown insulation avoids the need to remove drywall or flooring on the room side.
Dense-packing an inaccessible attic without checking local code first is one of the more common mistakes in this kind of retrofit; some jurisdictions require minimum ventilation even in spaces nobody ever walks into. When in doubt, a quick call to your local building official saves you from redoing the work later.
What R-Value and Code Requirements Apply to Knee Walls?
The IECC treats knee walls as part of the building’s thermal envelope, which means they’re generally expected to meet the same insulation standard as your home’s exterior walls for your climate zone. In practice, that typically lands somewhere between R-13 and R-21 for standard framed cavities, depending on where you live. Because a continuous air barrier is required alongside that R-value under IECC-aligned guidance, hitting the R-number without sealing the assembly doesn’t actually satisfy the intent of the code.
Cost expectations vary a lot by method and whether you hire it out:
- DIY batt-and-seal work: lowest material cost, mostly your own labor and a weekend or two
- Rigid foam retrofit with sealed seams: moderate material cost, still doable as a DIY project with patience
- Professional dense-pack cellulose: higher labor cost but fast, especially for hard-to-reach cavities
- Spray foam, pro-installed: the highest upfront cost of the common options, but often the best air-sealing result in one step
A simple top-up-and-seal project can be finished in a weekend. A full retrofit involving new sheathing, blocking every joist bay, and sealing the access hatch usually runs several days, longer if a contractor needs to pull permits or schedule an inspection for code compliance in your area.
What Should Be on Your DIY Knee Wall Insulation Checklist?
Before you head up into the attic, gather everything you need so you’re not making multiple trips through a hot, cramped space. Here’s what belongs on your list:
- Respirator or N95 mask rated for fiberglass and cellulose dust
- Long sleeves, gloves, and eye protection
- Caulk gun and paintable exterior caulk
- Canned spray foam for gaps and penetrations
- Rigid foam board cut to your cavity dimensions
- Foil or seam tape rated for rigid foam
- Utility knife and a straightedge for clean cuts
- A headlamp or work light, since attic access areas are rarely well lit
Work carefully. Attic floor joists aren’t a walking surface, and stepping between them onto drywall below has sent plenty of DIYers through a ceiling. Keep an eye on attic temperature since heat builds fast, take breaks, and treat any old wiring as live until you know otherwise. The Pioneer REC energy-saving guidance also flags the attic access hatch itself as a common leak point, so weatherstrip and insulate that door to match the rest of the envelope.
Before calling the job done, walk through this acceptance check: no visible gaps at the wall base, all rigid foam seams taped, every joist bay under the knee wall blocked, and the access door sealed tight when closed.
When Should You Call a Professional Instead?
Some knee wall situations are worth handing off, and recognizing them early saves you time and prevents bigger problems. Call in a contractor if you spot any of these:
- Ducts, plumbing lines, or mechanical equipment running through the triangular attic
- Cavities too small or too tight to access safely, even with a small port for dense-pack
- Signs of existing mold, staining, or water damage on the attic side of the knee wall
- Uncertainty about whether the knee wall is load-bearing or bracing the roof structure
- A complex roofline or a project that will require a building permit
When you’re vetting a contractor for this kind of work, ask for references specific to knee-wall or attic insulation jobs, proof of insurance, and examples of sealed sheathing installations they’ve completed. A contractor who can show you photos of properly blocked joist bays and taped rigid foam seams has actually done this work before, not just insulation in general.
Weigh the cost of hiring out against the risk of getting it wrong yourself, especially if mold or structural questions are on the table. A few hundred dollars spent on a proper assessment often costs less than fixing a botched DIY attempt later.
Field Notes From The Clean Genius Team
Air sealing gets skipped constantly, and it’s the single biggest reason homeowners call us back a year after a DIY insulation job with the same drafty bonus room. Fresh batts jammed into an unsealed cavity almost never fix the comfort complaint that sent someone up to the attic in the first place.
A few patterns show up again and again in the field. Knee walls with no attic-side sheathing lose heat fast no matter how thick the batts are. Attic access doors get insulated as an afterthought, if at all, even though they leak like an open window. And more than a few “insulation problems” turn out to be moisture or early mold issues once someone actually opens up the wall.
We treat attic insulation and attic mold prevention as one job, not two, because in practice they usually are.
Get a Local Assessment for Your Attic Insulation Project
Thecleangenius handles the parts of knee wall insulation that go wrong most often for DIYers: attic-side sheathing installation, joist bay blocking, and full air-sealing done right the first time. Where a typical insulation contractor stops at adding batts, our attic services cover removal and replacement of old insulation, attic-side air barrier installation, and attic mold remediation if opening up the wall reveals moisture damage nobody knew was there.

A site visit starts with an inspection of the knee wall assembly itself. Our team checks for missing sheathing, open joist cavities, and any signs of past moisture before recommending a scope of work, so you get a plan based on what’s actually happening in your attic rather than a generic estimate. If the inspection turns up mold or water staining, we can address it in the same visit instead of sending you to find a separate contractor.
Thecleangenius serves homeowners across Chicagoland, including Naperville, Schaumburg, Arlington Heights, and Elgin, with 24/7 availability for water damage and mold emergencies. If your bonus room has been uncomfortable for a season or two, or if you’ve opened the attic access and seen something you didn’t expect, request a local assessment and get a real answer instead of another guess.
Frequently Asked Questions
What is attic knee wall insulation, exactly?
It’s the combination of cavity insulation and an attic-side air barrier applied to the short walls separating a finished attic room from the unconditioned triangular attic space next to it. The air barrier matters as much as the insulation itself.
Is insulating a knee wall a DIY-friendly project?
Basic batt insulation and air sealing with caulk and rigid foam are manageable for most homeowners comfortable working in tight attic spaces. Spray foam installation and any project involving suspected mold or structural questions are better left to a professional.
How much R-value do I need behind a knee wall?
Most homes fall in the R-13 to R-21 range depending on climate zone, matching what code expects for exterior walls in that area. A local building official can confirm the exact figure for your zone.
Why does my knee wall room stay uncomfortable even after I added insulation?
Air leakage is the most common culprit. If the attic side of the wall wasn’t sealed with sheathing or rigid foam before or during the insulation work, attic air keeps moving through the cavity and undercutting the insulation’s performance.
Should I insulate the knee wall or the roof slope instead?
If the triangular attic behind the knee wall contains ducts, plumbing, or mechanical equipment, insulating the roof slope and bringing that space into your conditioned envelope is usually the stronger long-term choice. If it’s empty and stays unconditioned, insulating the knee wall itself works fine as long as air sealing is thorough.
Sources
- Attic Knee Wall – FSEC®
- Insulating behind kneewalls (Fine Homebuilding)
- Walls and knee walls — Insulation Institute